You probably know that 2017 is probably the last year that insecure websites are tolerated. Whether you have a simple blog or a showcase site, you will no longer have a reason not to switch to the HTTPS protocol. This is all the more true as encryption solutions have become increasingly simple and accessible, even to beginners.
In one of our previous tutorials, I showed you how to add https encryption on WordPress with Let Encrypt, but you should know that this solution is not always obvious to put together. In this tutorial, I'll talk about a much simpler solution, this is the encryption offered by CloudFlare for free.
What is CloudFlare?
If you do not know it yet, CloudFlare is a CDN provider. Basically, it is a service that allows you to get your files more quickly accessible to users given their location. If you want to know more, I invite you to read our Tutorial on CloudFlare.
What you need to know is that these solutions not only offer a static file hosting system, but also they offer solutions like security against DDos attacks and https encryption, and that is precisely what. which we will be talking about during this tutorial, as this is a service they offer for free in the basic plan.
Create an account on CloudFlare
The first step is to create an account on CloudFlare.

Once on your dashboard, click on "DNS".
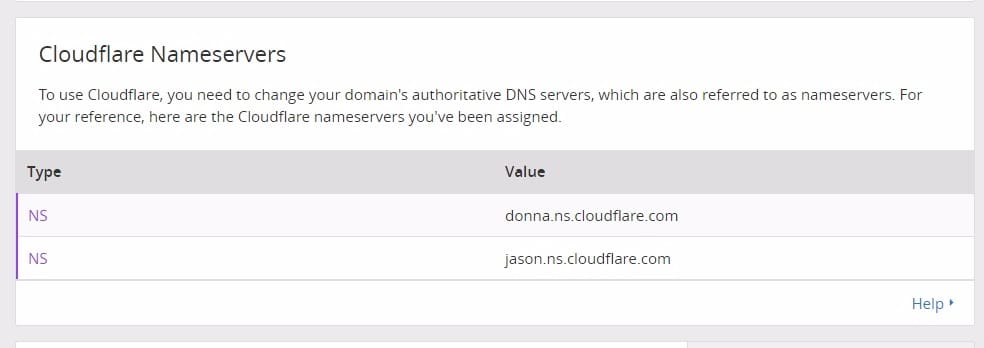
Now scroll down to the section " CloudFlare Nameservers ».
All you have to do is change the nameservers on your cpanel. On goDaddy, on the DNS management interface, you will find a section similar to this
You will need to replace this with the following:
Come back to goDaddy and add your domain and click on " Begin scan"
You must ensure that the scan is effective and that CloudFlare can access your website.
That's all, you're done. However, you must do some final steps to make sure everything is working normally.
How to force the https mode on CloudFlare
If you have already shared the links of your blog on other sites in http, then all those who will use these links will arrive on your site in http. To force the use of https mode, you must go back to the CloudFlare dashboard, and then click Page rules.
A new window will open where you have to define new rules.
Here, you must add your domain name with the addition of the slash and the asterisk “/ *”. Further down, you will have to choose on the drop-down menu the option " Always use HTTPS ". Once done, click on " Use and deploy ».
Bonus tip for migrating an existing blog
If you have a WordPress blog which was before on the http protocol, then performing this operation will not be complete because the links in your articles will always be in http. To fix this you need to use the plugin Better Search and Replace. The process is simple. You need to search tables from your previous domain name using the http protocol. For example: http://yourdomainname.com and replace it with: https://yourdomainname.com. But it does not stop there. In some cases, you will need to change the " http:// Simply for " https:// ". I admit that this last operation for blogs that have existed for a long time with the http protocol, is a bit risky so I will ask you to always have a backup of your database.
If none of this seems to work, contact us, we will be happy to solve this problem quickly.


