Often when reading WordPress tutorials, you may be prompted to add custom code snippets in your theme's functions.php file or in a plugin. The problem is that the slightest error can render your site unusable. In this tutorial, we'll show you an easy way to add custom code to WordPress without breaking your site.
The problem with custom code snippets
Often you will find code snippets in the WordPress tutorials with instructions for adding them to your theme's functions.php file or to a specific plugin on your site.
The problem is that even a small error in the custom snippet can make your site inaccessible.
The other problem is that if you add multiple snippets in a specific plugin, it can become difficult to manage the file.
Recently while researching a solution, we discovered an easy solution for allowing users to add and manage custom snippets on WordPress.
Add custom code snippets to WordPress
The first thing to do is to install and activate the plugin « Code Snippets " on your website. For more details, see our step by step guide on how to install a WordPress plugin.
Upon activation, the plugin will add a new menu item titled Snippets on your WordPress admin bar. Clicking on it will bring up a list of all the custom snippets you've saved to your site.
As you have just installed the plugin, your list will be empty.
Go ahead and click on the button Add New To add your first custom code snippet to WordPress.
This will take you to the page " Add a new extract ».
You must first enter a title for the code snippet. This could be anything that helps you identify the code. Then you can copy and paste your code into the code box.
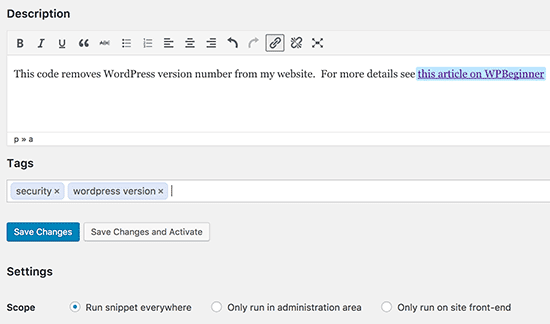
In the screenshot above, we've added a custom code snippet to remove the WordPress version number on our test site.
Function wpb_remove_version () {return ''; } Add_filter ('the_generator', 'wpb_remove_version');
Below the code box you will see a text box to add a description. You can add something here that helps you understand what this code does, where you found it, and why you are adding it to your site.
You can also assign tags to your code snippet. This will help you sort your code snippets by subject and feature.
Finally, you can click on the button Save changes and activate ».
If you just want to save the snippet and not activate it, you can click the " Save Changes ».
You can also change the scope of the snippet. You can run it only on the dashboard, on the front-end or anywhere. If you are not sure, keep the default option " Run the snippet everywhere ».
Once you save and activate the snippet, this code will automatically apply to your site.
Manipulation of errors in custom code
Normally, if you make a mistake adding custom code in your site-specific plugin or file, this will make your site inaccessible.
You will start to see a syntax error or 500 error on your site. To resolve this issue, you will need to manually cancel your code using an FTP client.
The neat part of the Code Snippets plugin is to automatically detect a syntax error in the code and disable it immediately.

Manage your custom code snippets
The plugin « Code Snippets Provides a simpler graphical user interface for managing your custom code snippets on WordPress.
You can save snippets without activating them on your site. You can deactivate the extract at any time. You can also export specific snippets or export them.
If you are transferring websites to a different server, you can easily import your snippets using the plugin " Code Snippets »By visiting the page« Import Snippets ».
The plugin « Code Snippets Works without configuration, but you can change the plugin settings by visiting the Extract Setup page.
That's all for this tutorial, I hope it will help you better manage code snippets on your blog.


